How to Make Writing a Breeze with the Wacom Intuos
Intuos And Intuos Pro
How to Make Writing a Breeze with the Wacom Intuos
Written by: CS Jones

No, not handwriting, although it’s useful for that too.
This will be a guide to how to set up the Intuos—or any Wacom tablet with four buttons—as a powerful productivity aid for noveling, freelancing, coding, teaching online, or just general office work.
Back before working for Wacom was even on my radar, I used a 2013 Intuos Pen & Touch as a full-time mouse replacement for four years. I now use a Cintiq 16 HD for art and a Logitech gaming mouse for everything else. The Cintiq is the best art tool I’ve ever used, but I recently realized I miss using the flat tablet for work. Partially because the interface was more efficient, but I think a lot of it was also psychological: What do we associate more with writing than pens? Just using it, even for ordinary articles, seemed to put me in creative mode.
Yes, holding a pen for several hours on end takes some getting used to. Your hand might be sore for the first few days. And you’ll want to practice tucking it into your thumb crease while you type to make the switch between navigating and writing faster. But once you’re fluid with it, it’s more efficient, ergonomic, and fun than a mouse. It’s very satisfying to scroll by hovering and flicking your pen, highlight text the way you would in a book, physically drag paragraphs down the page to reorder them, and cut and paste with one tap of a button.
If you’re an artist as well, it also helps you keep in practice holding and making fine movements with a tablet pen even when you’re not drawing.
I don’t have the Pen & Touch anymore; I gave it to a friend whose tablet was stolen. But I currently have a new Intuos Small, so in this article, I’ll unbox it and recreate my old setup.

In the interest of monetary honesty, this one was given to me by a manager a year ago and has been sitting in the closet neglected since then, so using one I got for free is less daunting than the idea of buying one for the purpose. But this model, a Small, retails for $95, half the price of a Medium, so if you’re interested in trying a tablet, it’s not a huge investment for both a mouse alternative and a capable drawing tool. Figuring out what size tablet you need can be tough, but the small is perfect for this purpose. It’s the size of a mousepad but more precise than a mouse, so you have more room to move in the same area. Even with a dual-1080p-monitor setup like mine, it feels fine.

Anyway, inside the box are the tablet, the pen, a Micro USB cord, and a very thin manual.* Don’t worry, you won’t need it until you change the nib: Once you install the universal driver from our website, It’s plug-and-play, and automatically detects whatever Wacom tablet you use.
*And a guide to how to recycle it in Europe, if you’re there and ever need to do that.
—
Note
If you look up any guide to setting up a tablet for drawing, they’ll tell you to put it in front of your keyboard so it’s also directly in front of the monitor, not to the side like a mousepad. But for writing, feel free to do the opposite.
—
Setting preferences
I’ll walk you through the configuration process as if you’ve never used a tablet before, because maybe some people reading this won’t have. If you’re experienced with them, some of this will seem redundantly basic. But some of the other tips and shortcuts, you might not know as well. So bear with me.
Once you’ve installed the driver, open Wacom Tablet Properties. For anyone who hasn’t used it, there’s a lot more than meets the eye here.

When you install it, it automatically creates profiles for your installed image editing programs—or the big ones, at least—and everything else is covered under All Other. Any programs you add will copy this profile by default, so let’s punch in some foundational settings, starting with Mapping:

We’ll leave it on Pen Mode despite using it as a mouse. You want to get used to mentally mapping your tablet to the elements on your screen, and Pen Mode is far more precise anyway. Not to mention you’ll never lose your cursor again.
If you’re using one monitor, turn on Force Proportions to match your tablet’s aspect ratio to your screen’s. You’ll need this for drawing, anyway. If you’re using two monitors, leave it off or it’ll reduce your tablet’s active area to a tiny sliver. You’ll need it for one type of program, but we’ll get to that later.
Next, Pen:
Set the lower button to middle-click instead of its default scroll. When it’s on scroll mode, you have to drag the pen across the tablet to scroll up and down. If you set it to middle-click, you can simply click once and navigate by hovering. Middle click also lets you quickly open and close Chrome tabs, and everything else clicking the scroll wheel does in other programs.

Desktop from Gris
Writing program settings
Now, Tablet: For this step, we’ll be adding a writing program and a browser. Clicking the + brings up a list of a list of all the programs you currently have open, so you can create a separate mapping profile and shortcuts for each one.
I do my fiction writing in Scrivener and my article writing in a Google Docs desktop app, with different settings for each, but for simplicity’s sake, I’ll demonstrate with MS Word.
Those four buttons, FYI, are called ExpressKeys, and any number of program or navigation functions can be assigned to them. For writing, we’ll do keyboard shortcuts. For the top left one, go to Keyboard > Keystroke, and in the popup window, hit Ctrl-X in the top field and name it Cut in the bottom one.

Keep adding basic shortcuts until you have this, or whatever alternative suits you:

Note that one key’s still on default: Since cut, copy, and paste cover my basic editing needs, I’m left with a free space. I’ll use it to create a shortcut menu for my common formatting functions. So, let’s pop over to On-Screen Controls.

As you’ll see, this lets you create infinite toolbars. They’re program-independent, so you can create one general “writing” one to use the same shortcuts across different programs.
There are two types of menu: Grids and Radials, and grids come in horizontal, vertical, or square. I’ll make a new single-column vertical grid for all my common shortcuts in order of use—Ctrl-I, Ctrl-E, Ctrl-K, Ctrl-B—and creatively call it “Writing.”

And I’ll assign it to the final ExpressKey. Menus normally disappear after you select an option, but you can use the pin icon to make it a permanent toolbar. From now on, I’ll stick mine to the margin of whatever I’m working on.

Important
If you’re using Windows 10, uncheck “Use Windows Ink” in the Mapping panel for all your writing programs, or else you’ll get that infuriating Handwriting popup every time you place your cursor.

If that still doesn’t work, you can turn the box alone off through Windows by searching for “Pen & Windows Ink” settings in the taskbar, and changing this one from “When the keyboard isn’t attached” to “Only in tablet mode.”
—
Browser settings
We’re going to do one thing different here. There’s one capability that’s still missing: zoom. The normal Intuos doesn’t have any equivalent to a mouse’s scroll wheel. Some other Wacom products have a touch ring that can be programmed to serve that function—The Intuos Pro, Cintiq 13HD, ExpressKey remote, and various older models—but not this one.
But don’t worry, the Intuos has a workaround. An inelegant one, I’ll admit, but it’s better than switching back to the mouse every time you need a closer look at something.
Besides image editing programs, Chrome is probably where I need to zoom in the most for things like Google Maps. Since I don’t often cut when browsing the web, and I can just use Ctrl-X when I do, I’ll set the first key to Navigation > Pan/Zoom.

While the button is held down, hovering the pen will scroll, and dragging it up or down on the tablet will zoom. You could simplify things and just program this function to the lower pen button, but then you’d lose middle click functionality for things like opening browser links in a new tab. It’s a good idea for any program where middle click doesn’t do anything, though.
—
Also important
You’ll need to turn off Windows Ink for Chrome and any other Google apps, too. It causes a pen tracking glitch. Same with Discord, for some reason. In fact, you really only need to leave it on for Photoshop.
—
Image editing settings
Of course, I’ll still use the Cintiq for any serious work, but for simple cropping and color correction, it’s sometimes more convenient to just bang it out on the flat tablet. Any artists present will already know to do this, but for Photoshop and any other drawing or image editing programs, set the active area to one monitor and turn on Force Proportions.

If you’re using two monitors, don’t worry, all you have to do is click your Windows taskbar to navigate back to the non-photoshop monitor.
Services & Saving
If you’re on Windows, occasionally your computer will fail to detect your tablet, in which case you’ll have to reset the Wacom driver through the Services window. This is something everyone should know how to do. Every problem I’ve ever had with a Wacom device has been fixable this way.
You can also use the stop and start icons at the top of the window. You can pin services to your taskbar once it’s open, too.
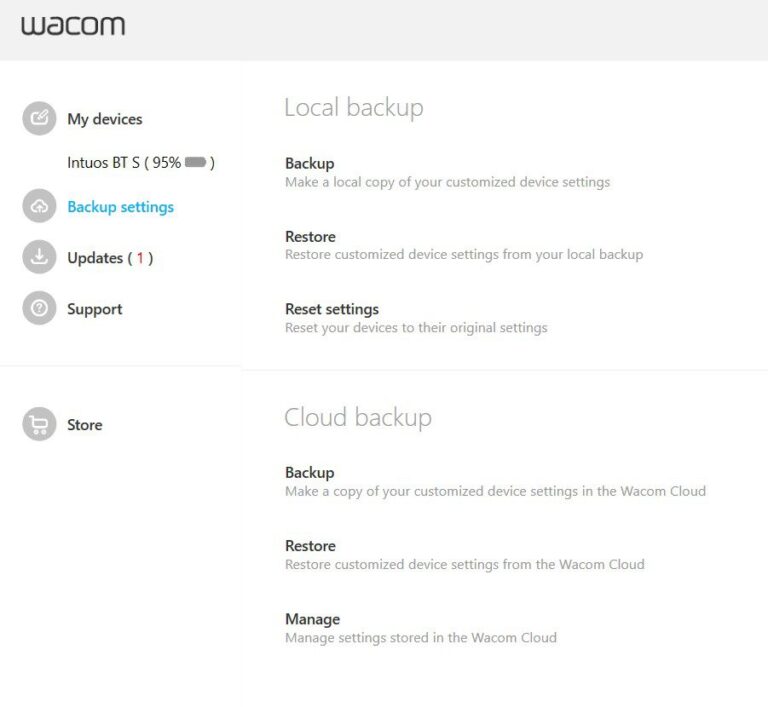
But once in a blue moon—every few months, perhaps—this might wipe your preferences. So once you’ve set them, make sure to save them through the Backup Settings panel in Wacom Desktop Center. You can either save them as a .pref file to your hard drive, or upload them to the free Wacom Cloud, then restore them with the very next button.
Impressions of the Intuos
Zoom hitch aside, this is an even better mouse replacement than the 2013 Pen & Touch was. The P&T had a smooth plastic surface that constantly reminded you that you were using a computer peripheral. The current gens have a rubbery textured surface that genuinely make it feel like you’re somehow using a ballpoint on a notebook to control your computer. And the pen helps with that too: It’s lighter and thinner than either the P&T or the Cintiq, just 5½ inches long by 1/3 inch thick, smaller than a Bic.
But my favorite feature is the Bluetooth. Once the tablet’s charged via cable, you can connect it wirelessly and regain the use of your USB port. I didn’t see the point of this before I tried it—who uses a tablet further than a cord’s length away from the screen?—but now that I have, I never want to go back. It allows a lot more freedom of movement: I can slide it across the desk from one monitor to the other if I want to switch to another project on a different screen, without messing with the cable, or when I need the mouse for a game, I can simply turn the tablet off and set it aside. And once we can do these things again, it’ll be easy to slip into a backpack to use outside at a coffee shop, bookstore, or while traveling. It can be charged with any Micro-USB cable, so if you run it off Bluetooth, you can use a wall charger. It takes a few hours from empty to full, but it has a battery life of fifteen, meaning it’s good for two workdays or one brutal one.
Finally, in an interesting last-minute twist, I was surprised to find it compatible with the Cintiq—I could even draw into Clip Studio Paint with both at once—meaning I won’t need to switch them out. I don’t think an overabundance of Wacom tablets is a problem the average reader is likely to run into, but for example, if you ever find yourself graduating from a flat tablet to a drawing monitor, but aren’t quite ready to sell your old one, you can repurpose it as a mouse.